Customising with Studio
À l'issue de ce chapitre
- place what Studio allows and what it does not replace;
- measure its pricing and contractual consequences before activating it;
- add a field, reorganise a view, adapt a printed document;
- subject an action to approval;
- maintain your customisations over time.
Studio is a toolbox for adapting Odoo without writing code: adding a field, reorganising a screen, modifying a printed document, imposing an approval. It is aimed at the functional administrator, not at the everyday user.
Note
Studio belongs to the Enterprise edition, and access to it is reserved for database administrators: the icon only appears in the top bar for them.
What Studio allows
| Area | What you do there |
|---|---|
| Fields | Add a piece of information to the data model, or reuse an existing field on another screen. |
| Views | Reorganise a form, add a column to a list, a filter to the search, activate a view not offered by default. |
| Models and applications | Create a data model, or even a complete application, for a need that no standard application covers. |
| Automation rules | Trigger a process on an event, without going through the technical screens (see chapitre 21). |
| PDF reports | Adapt the presentation of printed documents: quotations, invoices, delivery orders. |
| Approval rules | Subject a button's action to the approval of one or more people. |
Note
Studio acts on the configuration of the database, not on its code. What it produces is stored as data, which makes it accessible without technical skills , and also explains the precautions described in section 23.8.
Before activating Studio
Point d'attention
Installing Studio on a database on the Standard pricing plan automatically triggers the move to the Custom plan. This is not an option to tick and then untick: on an annual or multi-year contract, an additional purchase order is issued with a 30-day term; on a monthly contract, the new price applies when the next invoice is issued. Have this point approved before installing.
Two questions deserve to be settled beforehand:
- Does the need really call for Studio? A field useful in a single context is handled by a property field, without installing anything (see section 4.4). A piece of information to be produced on a one-off basis is written in the editor.
- Who will be allowed to touch it? Studio is open to database administrators. A customisation made without consultation is hard to trace, and nobody dares go back to it.
Opening and closing Studio
- Go to the application and the screen to be modified.
- Click the Studio icon in the top bar.
- Make the modifications.
- Click Close, top right, to return to normal use.
Note
Studio opens on the screen you are viewing: what you modify there applies to that screen and that model. It is therefore safer to reach the right screen first, then open Studio, than the other way round.
Reading the Studio screen
The screen reorganises itself into three areas, around the view being edited.
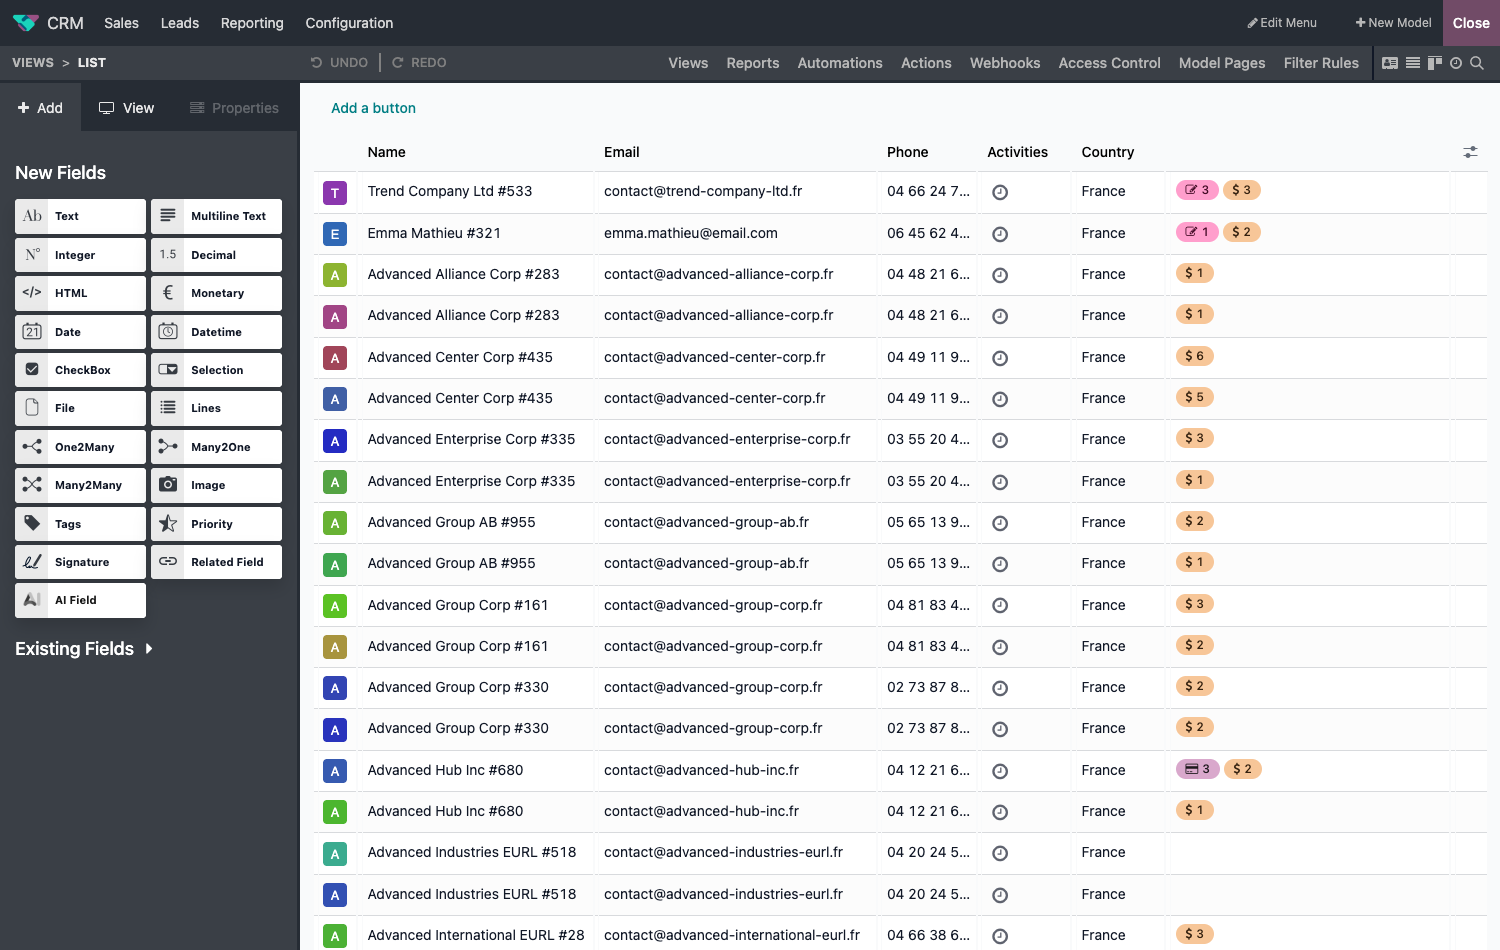
The top bar carries three commands that concern not the view but the application: Edit Menu to rework the menu entries, New Model to create a data table, and Close to leave Studio.
The tab bar, just below, gives access to everything that can be customised on the model. The view is only one part of it.
| Tab | What it allows |
|---|---|
| Views | Modify the presentation of the screens. This is the tab open by default. |
| Reports | Adapt the printed documents , see section 23.6. |
| Automations | Create rules triggered by an event, without going through the technical menu (see chapitre 21). |
| Actions | Define processes executable on the records. |
| Webhooks | Open an address allowing an external system to trigger a process. |
| Access Control | Set who can read, create, modify or delete the model's records. |
| Filter Rules | Manage the model's saved searches (filters, groupings, sorting) and their sharing. |
To the left of that bar, a breadcrumb recalls the view being edited: Views then the view type, and two commands Undo and Redo undo or replay the last operation. To the right, a series of icons switches from one view type to another without leaving Studio. Only the types already activated on the current screen appear there; the complete list of possible types is: form, list, kanban, map, calendar, graph, pivot, Gantt, cohort, activity and the search bar.
The left-hand panel carries three tabs: Add presents the elements to drop into the view, View the settings of the whole view, Properties those of the selected element.
The Add tab is itself divided into two blocks. New Fields offers the palette of field types to create: text, number, date, checkbox, relation to another table, and others. Existing Fields lists the fields already present on the model but absent from the view, which you need only drag to display.
Astuce
Before creating a field, always expand Existing Fields. Odoo defines on its models any number of fields that the standard views do not display: the need is often already covered, and an existing field goes on being filled in by the software, which a created field never will be.
Note
The view itself remains manipulable during editing: on a list view, an Add a button button appears above the table to place an action within one click of the selected records.
Adding a field
- Open Studio on the form concerned.
- From the left-hand panel, drag the field type you want to the position you want.
- Name the field.
- Set its properties: required, default value, display condition, groups allowed to see it.
- Close Studio.
Astuce
A field exists independently of the screens that display it. Add it once, then place it on the other views where it is useful rather than creating a second one with the same name.
Point d'attention
A field added by Studio appears for everyone and on every record of the model. If it only concerns one population, restrict its visibility to the groups concerned in its properties.
Reorganising a screen
Studio allows you to move a form's fields, create tabs and sections, add a column to a list view or a filter to the search bar.
- Open Studio on the view to be modified.
- Drag the elements to their new position.
- For a list view, add the useful columns from the left-hand panel.
- Close Studio.
Note
Each view type is modified separately: reorganising the form changes neither the list nor the kanban view of the same model.
Adapting a printed document
Studio's Reports tab allows PDF documents to be reworked: quotations, delivery orders, invoices.
Point d'attention
IROKOO recommendation: do not use this editor in version 19. The reasons are detailed below. Set what can be set through the standard document layout, and entrust the rest to a development, which will produce a maintainable document taken over as is at version upgrades.
What the standard layout already allows
Before considering anything else, check what can be set without Studio: the logo, the colours, the font, the layout format and the footer mentions are configured from the general settings. These settings pass through version upgrades without intervention, which no document customisation guarantees.
The procedure is in section 5.2.
Why the editor is a problem
Three reasons, in order of severity.
The reset spills beyond the document being handled. The Reset report button offers an Include header and footer box, ticked by default. Now the header and footer are not specific to the document: they are shared by all the documents in the database. Odoo says so under the box, but the warning is easily skipped over. Resetting an invoice with the box ticked therefore also resets the header of every other document, including the customisations another contributor may have made to it.
The editing bears on template code. What the editor presents as movable blocks is in reality markup. An unfortunate manipulation does not produce a badly presented document but a document that no longer prints, and diagnosing it then means reading the template.
The copy freezes the document. Duplicating a standard document in order to rework it creates an
independent copy, named after the original followed by copy(1). That copy no longer
receives any evolution of the standard: neither the corrections, nor the legal mentions added by
localisation updates. On an invoice, that is a compliance risk.
If you must nevertheless resort to it
- Open Studio from a document of the type to be modified.
- Choose Reports, then the document template.
- Modify the text directly in the document, as in a word processor.
- Insert the variable values with the
/command , see below. - Save.
Inserting a field. Unlike previous versions, fields are no longer dropped from a side panel: they
are called up from the keyboard, in the body of the document, by the same mechanism as in email
templates. Place the cursor where you want it, type / and choose from the two commands in
the Report Tools category:
| Command | What it inserts |
|---|---|
| Field | A value from the record being printed. The selector allows relation fields to be browsed in depth, and asks for a fallback value in case the field is empty. |
| Dynamic Table | A table built on a relation field: one row per linked record. That is how a list of order lines or of due dates is obtained. |
Edit field does not appear in that menu: the command appears in the floating toolbar when a field already inserted is selected, and allows its expression or its fallback value to be changed without deleting and replacing it.
Note
This change explains a good part of the difficulty met by those who knew the editor of previous
versions: the field panel has gone, and nothing on screen indicates that the / command
has replaced it.
Note
Two precautions in that case. Test the printing after every saved modification, on a real document: it is the only way to know which manipulation to go back to if something breaks. And if you reset, untick Include header and footer unless you specifically want to reset the layout of every document.
Subjecting an action to approval
An approval rule makes a button's effect conditional on the agreement of one or more people, confirming an order above a certain amount, approving an exceptional discount.
- Open Studio on the form view carrying the button: the Approvals block is only offered in the form editor.
- Select the button concerned: the Properties tab of the left-hand panel shows its settings, under the heading Button.
- In the Approvals block, click Add an approval step.
- Designate the Approvers, or an Approver Group, or both.
- Fill in, if needed, the Users to Notify and a Description, shown on the button to indicate what is expected.
- Set the Approval Order and, if necessary, tick Exclusive Approval.
- Close Studio.
| Setting | Effect |
|---|---|
| Approvers | The people entitled to approve or refuse. Each receives an activity when their agreement is requested. |
| Approver Group | Opens the right to approve to the members of the group, by membership rather than by name. Unlike named approvers, no activity is created for them: the request does not appear in their activity list. |
| Users to Notify | People informed of the decision: by an internal note on the document, not by email. They do not approve. |
| Approval Order | The rank of the step, from 1 to 9. Several steps chain in that order: the second is only requested once the first has been obtained. |
| Exclusive Approval | Forbids the person who approved this step from approving another one on the same record. It is the setting that imposes a genuine second look rather than a double signature by the same hand. |
Note
An activity is created for each approver when their agreement is requested: the request appears in their activity list, it does not depend on an email.
Astuce
An approval rule can be conditional: giving it a domain restricts it to the records that satisfy it. That is how an approval is required only above a certain amount, without slowing down ordinary orders.
Note
The same panel carries two other settings of the button, unrelated to approval. Invisible hides the button, possibly conditionally. Rainbow Effect, offered on buttons that trigger a method and not on smart buttons, triggers a congratulation animation when the button is activated, with a message you write.
Maintaining your customisations
Point d'attention
Studio customisations survive updates, but not without supervision. A heavily reworked view can stop working when the standard screen it modifies changes from one version to the next. The symptom is brutal: the screen no longer opens.
A few rules limit the risk:
- Add rather than move. Adding a field to a form is robust; reorganising a standard screen entirely is much less so.
- Keep the list of your customisations: which screen, which field, for what need, at whose request. It is that document which makes it possible to decide, two years later, between fixing and deleting.
- Test on a copy before every version upgrade, and allow time in the schedule for reworking the customised screens.
- Entrust to your integrator what has to last. A customisation carried by a module is deployed on every environment, can be read back and maintained; entered in Studio, it exists only on that database.
Choosing the right tool
- Property field: a piece of information specific to a context, without installing anything.
- Studio: a lasting need on a model, with no particular business logic.
- Specific module: as soon as there is computation, constraints, or a need to deploy the same thing on several databases.