Accounting and finance
À l'issue de ce chapitre
- adapt the chart of accounts and enter manual journal entries;
- reconcile bank movements and match the items on control accounts;
- allocate expenses and income by analytic dimension;
- lock periods, produce the financial statements and close a financial year.
chapitre 12 covers the operational invoicing cycle. This one covers bookkeeping: chart of accounts, journal entries, bank reconciliation, analytic accounting, closing and financial statements.
Setting up the chart of accounts
Localisation
The chart of accounts is installed automatically by the fiscal localisation chosen when the database goes live (see section 5.5). For France, it is the Plan Comptable Général.
Note
The Plan Comptable Général is the French statutory chart of accounts. On another localisation the mechanism is the same: the package installs the chart of the country concerned.
Point d'attention
The fiscal localisation is chosen before the first journal entry. Changing it on a database that already holds data is not a configuration exercise but an accounting migration.
Adapting the accounts
- Open Accounting › Configuration › Accounting › Chart of Accounts.
- Create or edit the accounts your business needs.
- For each account, check the type, the currency where there is one, the default taxes attached and whether reconciliation is allowed.
Note
Tick Allow Reconciliation on control accounts and on suspense accounts. Without it, clearing the balances of those accounts becomes impossible.
Entering journal entries
Kinds of entry
- Sales entries, generated by customer invoices.
- Purchase entries, generated by vendor bills.
- Bank and cash entries, coming from payments and statements.
- Miscellaneous entries, keyed in by hand: provisions, accruals, payroll, depreciation.
Entering a manual journal entry
- Open Accounting › Accounting › Transactions › Journal Entries.
- Click New.
- Check the Journal: Miscellaneous Operations is offered by default.
- Check the Accounting Date and fill in a meaningful Reference.
- In the Journal Items tab, click Add a line and fill in for each of them the Account, the Label, then the amount in Debit or in Credit.
- Fill in the Partner on the lines that use control accounts: without it, the line will not appear in the partner ledger and cannot be matched.
- Check that total debits equal total credits.
- Click Post.
Note
The Tax Grids column appears on lines carrying a tax. It shows which box of the return the amount will be reported in: this is what links the entry to the VAT return, and it is worth checking on a manual entry, where nothing is derived from a commercial document.
Point d'attention
An unbalanced draft cannot be posted: Odoo refuses the operation. That is the guarantee that no document can throw off the trial balance, but it also means the mistake is to be looked for in the lines, and nowhere else.
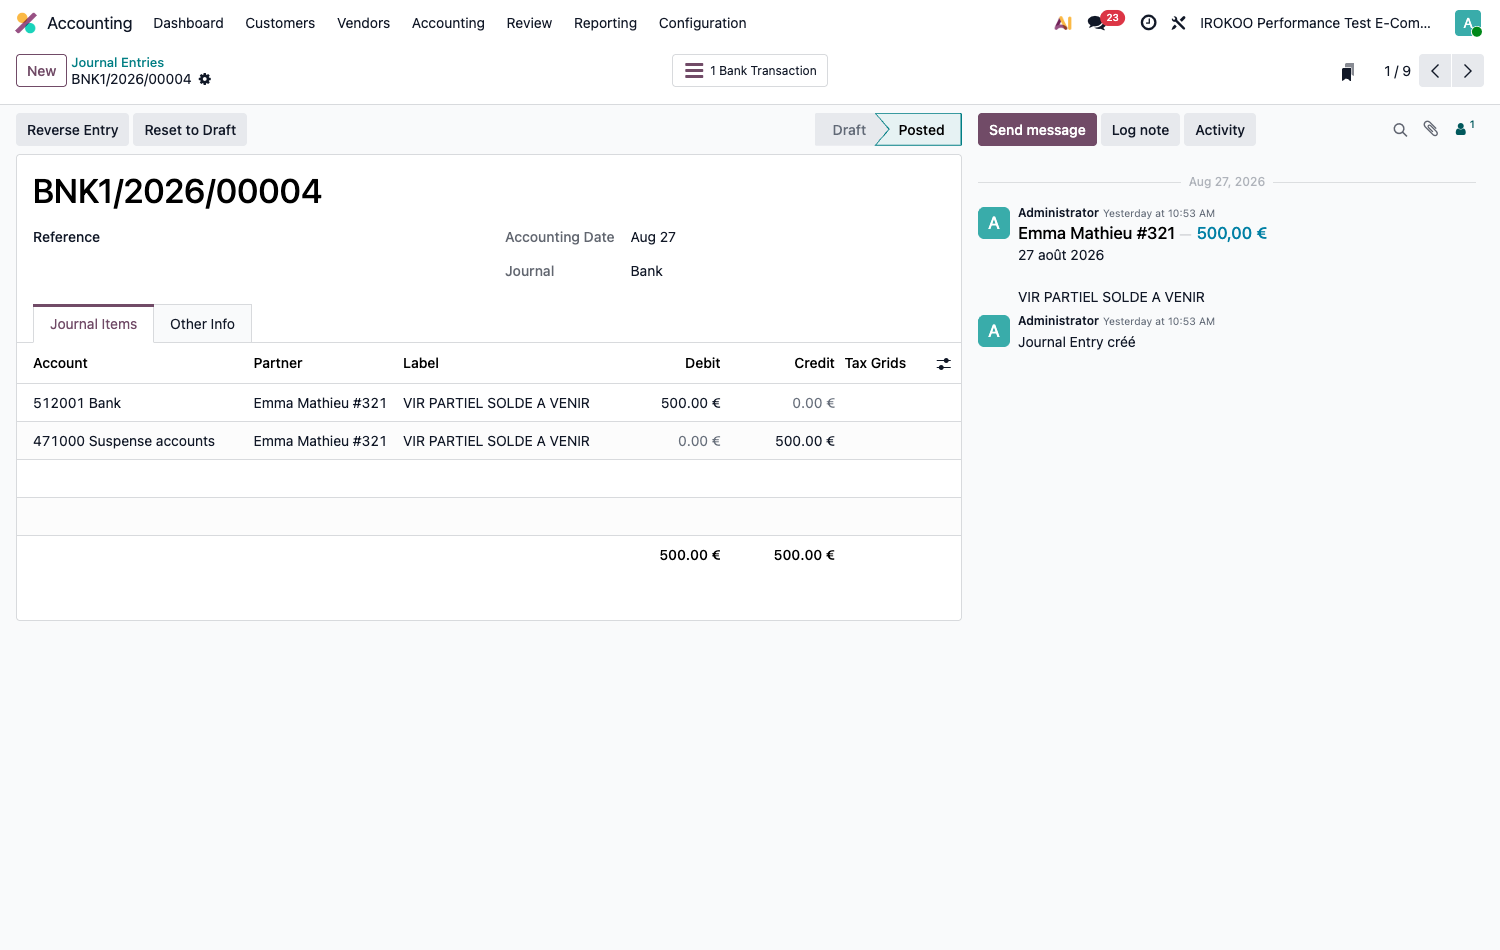
Correcting a posted entry
The correction goes through a reversal: rather than editing the faulty document, you record an opposite entry that cancels it, then key in the right one. Both remain visible, and the path that led to the correction can be read in the accounts.
- Open the document concerned.
- Click Reverse Entry.
- Fill in the date of the reversal. The Reason displayed on Credit Note field only appears on an invoice, not on a miscellaneous entry.
- Validate: an opposite entry is generated, reconciled with the original.
- Then key in the correct entry.
Note
Odoo also offers Reset to Draft, which makes the document editable again. This button does not always appear: it disappears as soon as the document is protected by a digital fingerprint (see section 12.2.5), and its use is blocked if the date of the document falls in a locked period (see section 14.5.2).
A database configured for France therefore ends up offering nothing but the reversal, once hashing is active and the periods are closed. That is the intended behaviour: the inalterability of accounting records is a legal obligation, not a limitation of the software.
Point d'attention
For as long as those protections are not in place, resetting to draft remains possible and wipes out the trace of the original entry. That is convenient in the start-up phase, dangerous afterwards: have your accountant put hashing and the lock dates in place before the first close.
Astuce
In practice, keep resetting to draft for mistakes spotted immediately, on a document nobody has seen. As soon as a document has gone out to a third party or a return has been filed, reversal is the only correct route.
Reconciling the bank
Bank reconciliation consists in matching each line of the bank statement with the accounting document it corresponds to: an invoice paid, a vendor payment, bank charges. It is the most repetitive accounting work, and the one that lends itself best to automation.
For as long as a transaction is not reconciled, the invoice it pays stays in payment and not paid: reconciliation is what closes the cycle.
Feeding the statement
Three routes bring bank transactions into Odoo.
| Route | What it assumes |
|---|---|
| Bank synchronisation | Odoo connects to the bank and retrieves the transactions every day, without any intervention. Belongs to the Enterprise edition and requires a subscription to the connection service. |
| File import | The statement is downloaded from the bank then loaded into Odoo, in the common formats: CSV, OFX, QIF, CAMT. Free, but to be done again every period. |
| Manual entry | The lines are keyed in by hand. Reserved for very low volumes or for accounts with little activity. |
- Open the Accounting dashboard and find the bank journal card.
- Open the card's three-dot menu and, in the New column, click Import File; or key the lines in directly.
Astuce
Synchronisation pays for itself from a few dozen transactions a month: it removes not only the downloading, but also the forgotten periods and the double imports, which are the leading cause of divergence between the Odoo balance and the real one.
Reconciling
- Open the Accounting dashboard and find the bank journal card.
- Click the button announcing the number of transactions to reconcile.
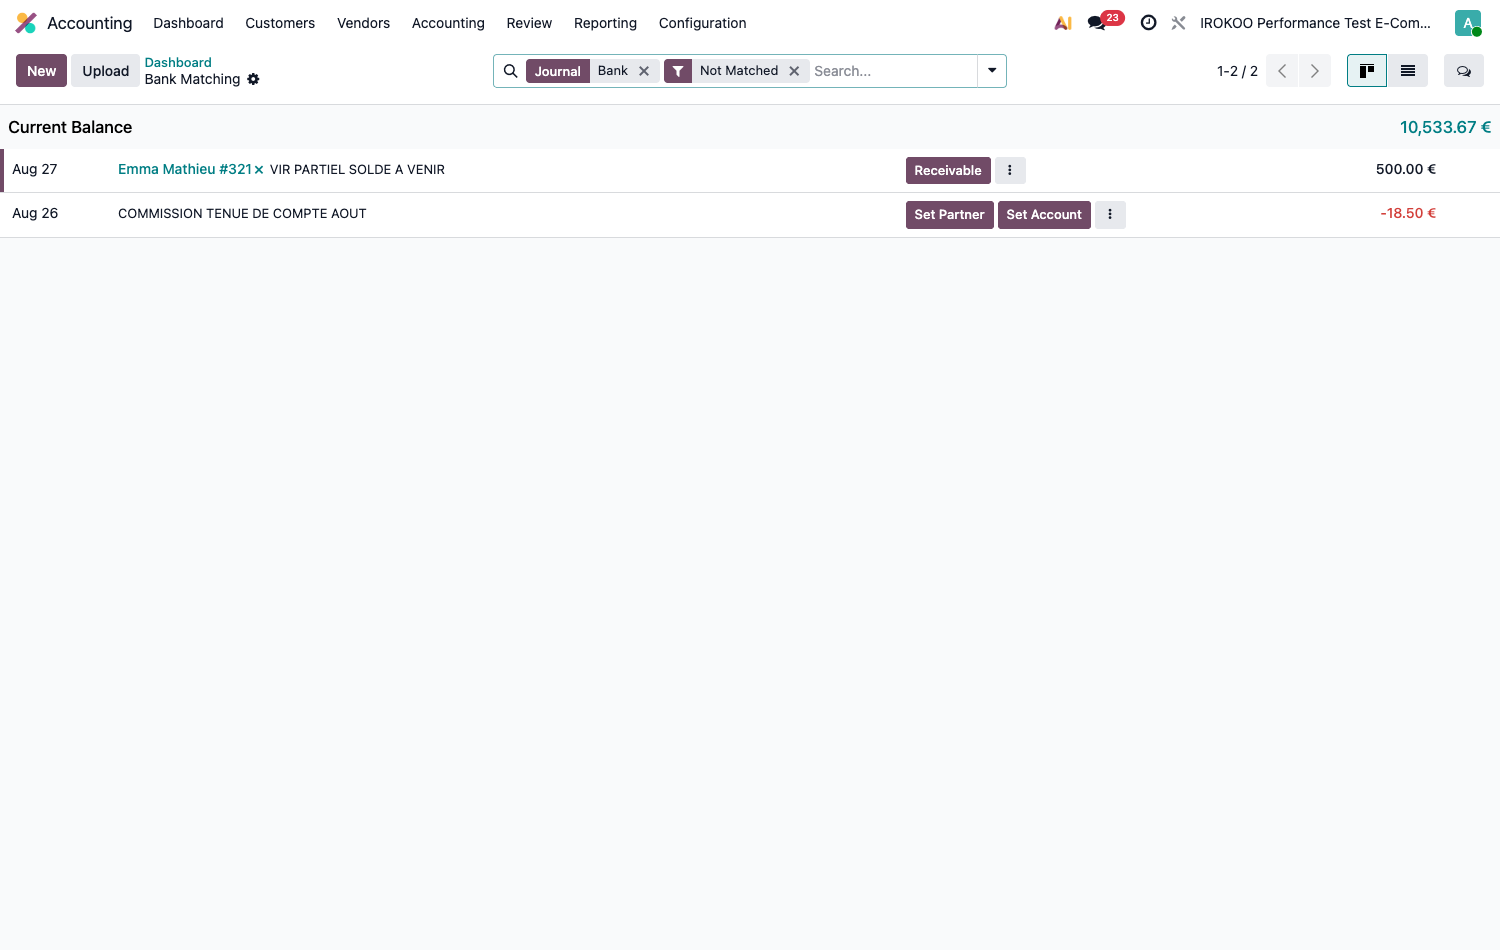
The Bank Matching screen lists the transactions not yet dealt with, with the account's Current Balance at the top. Each line carries the buttons that match its situation.
| Button | What it does |
|---|---|
| Reconcile | Reconciles the transaction with the document proposed. The figure beside it gives the number of documents Odoo has retained: a confident match proposes only one. |
| Receivable / Payable | Posts the transaction to the corresponding control account, without naming a particular document. To be used for a down payment received or a payment that does not yet settle anything. |
| Set Partner | Fills in the third party when Odoo has not recognised it, which brings up the documents that might match. |
| Set Account | Posts the transaction directly to an account, with no third-party counterpart. This is the route for bank charges, overdraft interest and commissions. |
The three-dot menu on each line gives access to the less common actions: the reconciliation models, Manage Models and Delete Transaction. To set a transaction aside without dealing with it, open it and click To Review; the Reviewed button lifts that marking.
Note
A transaction whose third party has been recognised shows its name at the head of the line. That is the first thing to check: a reconciliation right on the amount but wrong on the third party settles a receivable that is not settled.
Note
The Bank Matching screen belongs to the Enterprise edition, where it is available as soon as Invoicing is installed.
In Community, statements can be keyed in and consulted: the bank journal card gives access to them , but no screen proposes matches. Reconciliation is then done document by document: from each invoice, by applying the payments available through the outstanding credits banner (see section 12.6.2).
Point d'attention
A transaction reconciled against the wrong document settles an invoice that is not settled. The mistake does not show in the bank balance, which stays right, but in the aged receivables, where one debt disappears and another drags on. Take the time to check the third party as much as the amount.
Astuce
The Not Matched filter, active by default, shows only what remains to be dealt with. Removing it brings up the transactions already reconciled, which lets you go back on a mistake: a reconciled line can be undone as long as the period is not locked (see section 14.5.2).
Automating with reconciliation models
A reconciliation model describes a recurring transaction and the entry to record: the monthly bank charges, a rent collected by direct debit, a subscription. Once the rule is set, Odoo recognises it and proposes (or records) the entry by itself.
- From the three-dot menu of the bank journal card, section Reconciliation, click Models. From the reconciliation screen, the equivalent entry is called Manage Models.
- Create a model and name it.
- Set the recognition conditions: - the Journals the rule applies to; - the Label: Contains, Not Contains or a regular expression, with the Label Parameter to look for in the transaction description; - the amount, with Is lower than or equal to, Is greater than or equal to or Is between; - the Partners concerned, where relevant.
- Set the counterpart: the account to be moved, the label of the entry, the taxes where there are any, and how the amount is split: Fixed, Percentage of balance, Percentage of statement line or From label.
- Choose how it is triggered.
| Trigger | Behaviour |
|---|---|
| Manual | The model is proposed on the reconciliation screen when the transaction matches. The accountant validates. |
| Automated | The entry is recorded without intervention as soon as the transaction matches the conditions. |
Point d'attention
Only switch a proven rule to Automated. A criterion that is too broad (a label that merely contains the name of the bank) reconciles unrelated transactions, and the faulty entries do not announce themselves.
Leave the rule on Manual for a month or two: if it consistently proposes the right entry, it can be automated.
Astuce
Take three months of statements and spot what comes back identically. A dozen models generally cover most of the recurring transactions of a small business, and bring the monthly reconciliation time down from a few hours to a few minutes.
Note
The order of the models matters: Odoo applies the first one whose conditions are met. Put the most specific rules before the most general.
Matching down payments
The payment of a down payment passes through a control account dedicated to advances received. To clear the position of a customer who has paid a down payment and then the balance:
- Open Accounting › Accounting › Closing › Reconcile.
- Go to the advances and down payments received account, in the customer's group.
- Select the line of the down payment invoice and the deduction line carried by the final invoice: both are on that same account and cancel each other out.
- Click Reconcile.
Point d'attention
An unmatched down payment leaves the customer account apparently in debit and the advances account in credit. The aged balances and the follow-ups are thrown off by it, even though the cash position is right.
Analytic accounting
Creating the analysis dimensions
- Open Accounting › Configuration › Analytic Accounting › Analytic Plans.
- Create one plan per dimension of analysis: site, department, vehicle, activity.
- In each plan, create the corresponding analytic accounts.
Note
Several plans coexist and cross one another: the same expense can be allocated both by site and by department. Each plan answers a distinct management question; opening one without knowing which produces data that nobody uses.
Allocating
The analytic distribution is filled in on invoice lines, on manual journal entries and on timesheets. Distribution models make it possible to apply a split automatically according to criteria: general ledger account, partner, product.
Analysing
Open Accounting › Reporting › Management › Analytic Report to consult expenses and income by dimension, and to measure profitability by site or by activity.
Managing the periods
Fiscal year
- Open Accounting › Configuration › Settings.
- In the Fiscal Year section, fill in the Last Day: the month and day the year ends on.
- Save.
Note
There is no menu listing the years: the period is derived from that end date. For a year of a length other than twelve months (a first year, a change of closing date) enabling the corresponding option in the same section brings up explicit management of the years.
Point d'attention
This section belongs to the Enterprise edition, where it appears as soon as Invoicing is installed. In Community, the year-end date cannot be set from the interface.
Locking the periods
Locking prevents an entry from being recorded at a date earlier than the one set. Five locks coexist, each with its own scope.
| Lock | Scope |
|---|---|
| Lock Sales | Entries coming from the sales journals. |
| Lock Purchases | Entries coming from the purchase journals. |
| Lock Tax Return | Any entry carrying taxes. This is the lock to set after filing a return, so that no entry can alter a period already declared. |
| Lock Everything | All entries, whatever the journal. |
| Hard Lock | All entries as well, but with no exception possible and no going back. |
- Open Accounting › Accounting › Closing › Lock Dates….
- Fill in the dates you want.
- Save.
Soft or hard: the difference
The first four locks are soft. They stand in the way of entry, but an accountant can lift them temporarily by recording an exception: it carries a reason, a period of validity, and stays on record.
The fifth, Hard Lock, admits no exception. Its help text says so without ambiguity: This lock date is irreversible and does not allow any exception. Once set, it cannot be moved back, by anyone.
Point d'attention
Only set the Hard Lock after the year has been definitively closed and the accounts approved. There is no way back from it in Odoo, which refuses both to remove that date and to move it back: a date set by mistake on a period still open freezes the accounts of that period.
The four soft locks are enough for day-to-day running. Keep the hard lock for what is genuinely closed.
Astuce
The usual order is as follows: tax lock at every return filed, global lock at every accounts close, and hard lock once a year, after validation by the accountant.
Note
Lock dates belong to the Enterprise edition, where they are available as soon as Invoicing is installed. In Community, the securing of entries is still provided by the audit trail and by hashing, but no date can be set from the interface.
Point d'attention
The hard lock cannot be removed, not even by an administrator. It is set once the year is closed and the accounts filed, never "to see what happens".
Tax returns
VAT return
- Open Accounting › Accounting › Closing › Tax Returns.
- Select the period.
- Check the bases and the amounts: output VAT on sales, input VAT on purchases, balance payable or credit.
- Check the points the report flags for attention.
- Generate the tax closing entry.
- File the return, electronically where the function is available.
Note
The returns available depend on the localisation installed; in France it is the VAT return, and the filing goes to the tax administration's portal.
Note
Automated tax returns and their electronic filing belong to the Enterprise edition. In the Community edition, the bases are prepared from the tax reports and keyed in by hand on the administration's portal.
Setting the tax lock
Once the return has been filed, set the tax lock date to the end of the period declared. Any later entry affecting that period is then refused, which guarantees that the accounts and the return filed agree.
Financial statements
The financial statements belong to the Enterprise edition, where they are available as soon as Invoicing is installed. They do not exist in Community. They are reached from the Reporting menu of Accounting, sorted by family.
| Family | Report | Contents |
|---|---|---|
| Balance Sheet | The financial position at a given date: what the company owns and what it owes. | Profit and Loss |
| Income and expenses over a period, and the result that follows from them. | Cash Flow Statement | Where the cash came from and where it went over the period. |
| Trial Balance | The debit and credit balances of every account. This is the control report: it must balance. | General Ledger |
| The detail of the movements, account by account. | Partner Ledger | The detail of the movements by third party. |
| Aged Receivable | Receivables classified by how long they have been overdue. | Aged Payable |
| Payables classified the same way. |
Note
What is usually called the aged balance corresponds to the two aged reports: the receivable one for what is owed to you, the payable one for what you owe.
Reading a report
Every report shares the same toolbar, which governs what it shows.
| Setting | What it governs |
|---|---|
| Period | The year or the interval chosen. This is the first filter to set. |
| Comparison | Adds a column for the Previous Period or for a period of your choosing, and a percentage variance column. |
| All Journals | Restricts the report to certain journals, useful to isolate an activity kept in a separate journal. |
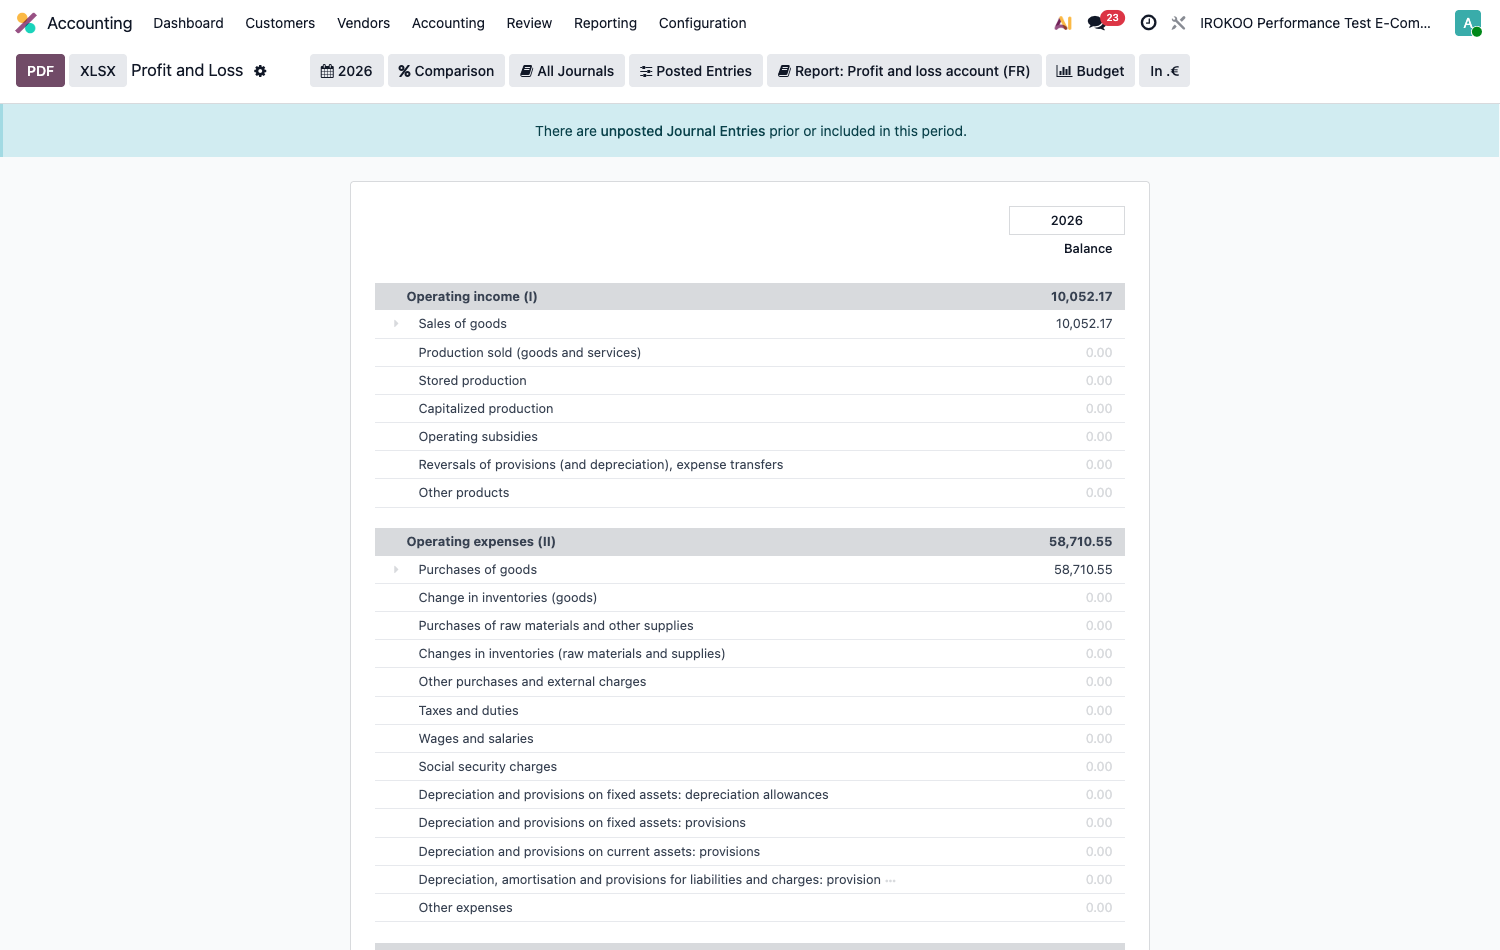
| Posted Entries | This button carries the current state as its label: Posted Entries, or With Draft Entries if drafts are included. The Draft Entries entry in its menu switches between the two. Official reports are read on the posted entries. |
| Report | Chooses the presentation variant. The French localisation installs one that follows the Plan Comptable Général. |
| Budget | Sets actuals against forecasts, where budgets are defined. |
The PDF and XLSX buttons, on the left, export the report as it stands: comparison and filters included.
Note
Lines carrying a chevron unfold down to the account, then down to the originating entry. So you go from a balance sheet total to the document that explains it without leaving the report or building a search.
Point d'attention
A banner flags the unposted entries that exist in the period or before it. It warns that the report does not reflect everything: drafts are waiting, and the figures will move when they are posted.
Never send a report carrying that banner to a third party (accountant, bank, administration) without having dealt with the documents waiting.
Annual report
Odoo lets you build the company's annual report from preconfigured templates, gathering the financial statements and the management commentary into a single document.
Point d'attention
This feature assumes three applications installed together: Accounting, Knowledge and Sign. Without them, the Annual Report entry does not appear in the menu, it is an add-on module that creates it, and that module only installs when all three are present.
The Audit menu then holds only the Working Files, which gather the reports and the supporting documents without the editorial dressing of the annual report.
- Open Accounting › Review › Audit › Annual Report.
- Click New.
- In the creation window, fill in the title and select the template and the period.
- Validate: the report opens in the editor.
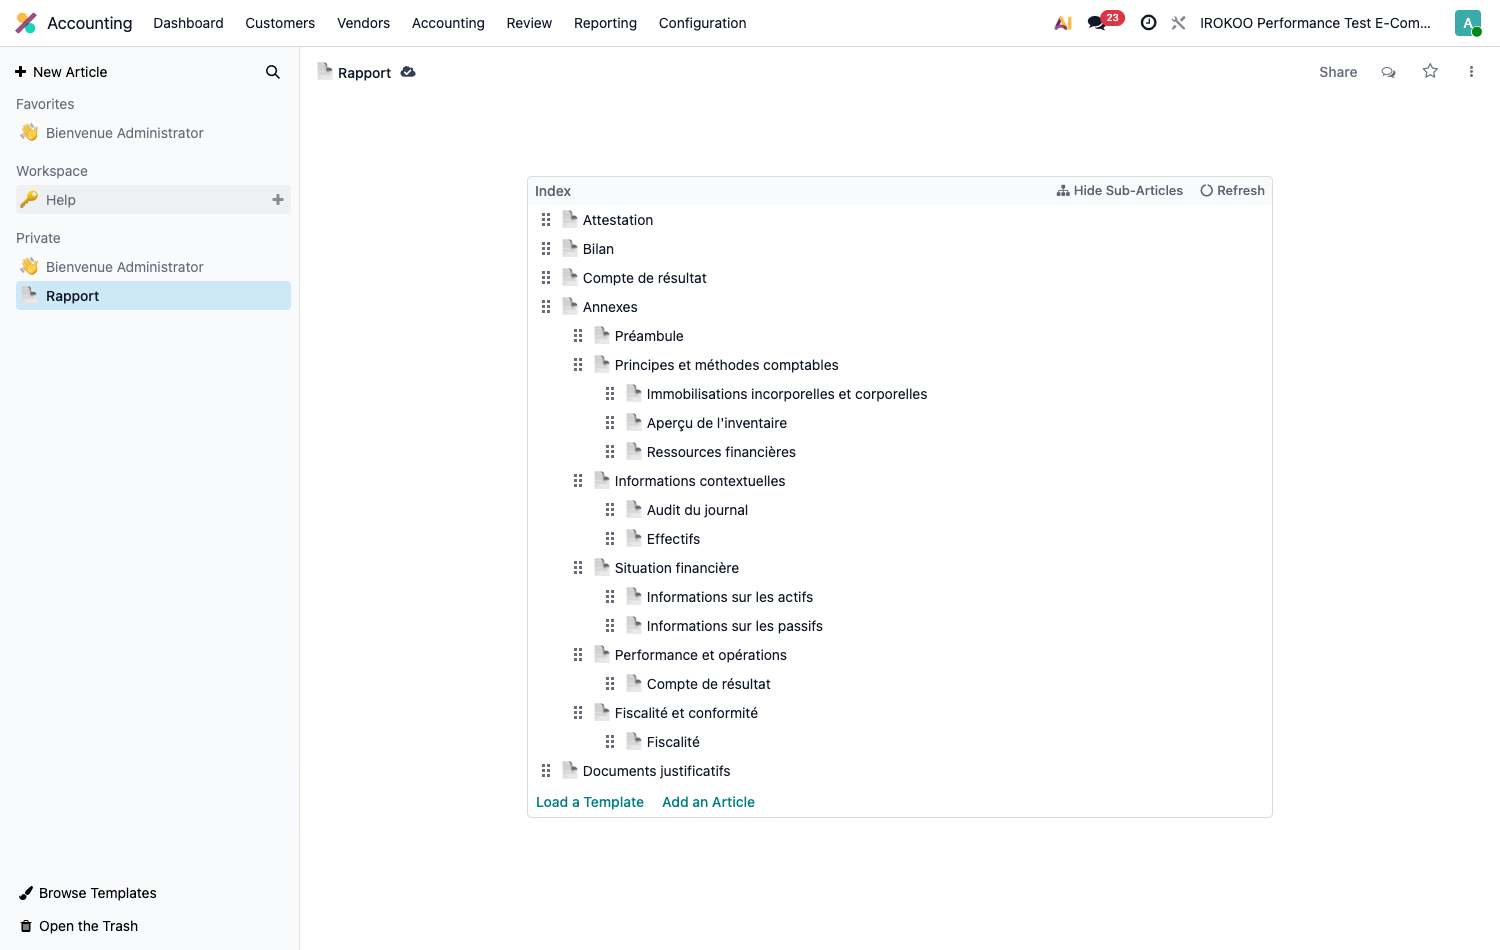
What Odoo prepares. The report is not a single document but a tree of sections, already structured by the template and summarised by an Index block at the top:
| Section | What it carries |
|---|---|
| Attestation | The signed statement of the director or the accountant. |
| Balance Sheet and Profit and Loss | The financial statements for the year. |
| Annexes | The body of the report, subdivided: preamble, accounting principles and methods, fixed assets, inventory, financial resources, contextual information, financial position, performance, taxation. |
| Supporting Documents | The documents to attach to the file. |
- Open each section and complete it: management commentary, significant events, explanations of the variations.
- Insert the financial statements into the body of the text, or attach existing documents.
- Add an Article creates an extra section; Load a Template inserts a ready-made structure.
- Share distributes the report, for reading or for editing.
Astuce
The Index block is updated with Refresh and follows the actual tree. It is the table of contents of the file: start by checking there that nothing is missing before you write, rather than discovering an empty section on the final read-through.
Note
Sections can be reordered by dragging and dropping from the index, and folded away with Hide sub-articles when the tree gets long.
Note
The annual report is edited in the knowledge base interface, integrated into Accounting. The same editing actions as in the articles are available there.
Multi-currency
Check the company's currency. The Currencies block of the settings carries the Main Currency, the one the accounts are kept in.
Activate the currencies you use. The Currencies link in the same block opens the list: activate there the ones you invoice or buy in. An inactive currency is offered nowhere.
Keep the rates up to date.
- Tick Automatic Currency Rates.
- Choose the Service that supplies the rates: the European Central Bank for a company in the euro area.
- Set the Interval: Manually, or an automatic frequency.
- The Next Run date shows when the next update will take place; the icon beside it triggers it immediately.
Documents are entered in their original currency and converted into the company's currency for the accounts. The exchange differences arising on payment are recorded automatically in the accounts provided for that purpose.
Note
Automatic rate updating belongs to the Enterprise edition, where it is available as soon as Invoicing is installed. In Community, the rates are keyed in by hand on each currency record.
Point d'attention
Left on Manually, the service fetches no rate by itself: that is the default setting, and the update has to be triggered every time. A database that regularly invoices in foreign currency gains from switching to an automatic frequency, failing which the conversions are made at a rate that ages without anything saying so.
Multi-company
Where several entities coexist in the database:
- each company has its own chart of accounts, its own journals and its own sequences;
- users' access rights determine which companies they can see;
- transactions between entities can automatically generate the mirror documents: the sales invoice of one entity creating the vendor bill of the other.
Point d'attention
Check the active company before any entry. An entry posted in the wrong entity is corrected by a reversal, with the cash timing difference and the tax consequences that implies.
Closing the year
The Review menu of Accounting brings together the closing tools. It is arranged in the order in which they are used.
1. Make sure everything has been entered.
- Open Accounting › Review › Control › Journal Items and replace the Posted filter with Unposted: the remaining drafts appear.
- Deal with them or delete them. A forgotten draft throws off the reports without signalling itself anywhere other than in the warning banner.
- Open Accounting › Review › Control › Journal Audit: the report lists the entries journal by journal, which makes it possible to spot a quiet period or a missing entry.
2. Identify what straddles the year end. The Purchases and Sales headings in the same menu flag the timing differences between the physical flows and the accounting flows:
| Report | What it reveals |
|---|---|
| Bill To Receive | Goods received whose vendor bill has not arrived. The expense has to be recognised in the year. |
| Billed Not Received | The opposite: a bill recorded for goods not yet received. |
| Invoices To Be Issued | Deliveries made that have not yet been invoiced. The income belongs to the year. |
| Invoiced Not Delivered | Invoicing ahead of delivery. |
3. Record the adjusting entries. Under the Regularization Entries heading of the Review menu of Accounting are three reports, which are not handled in the same way.
| Report | What to do with it |
|---|---|
| Unrealized Currencies | It recognises the unrealised exchange differences on balances held in foreign currency. The Adjustment Entry button records the adjustment; it is always available. |
| Deferred Revenues and Deferred Expenses | They list the income and the expenses to be carried to another year. The Generate entry button only appears if generation is set to Manually & Grouped in the settings. |
4. Deal with the fixed assets. In Accounting › Review › Inventory › Depreciation Schedule, the report summarises the year's depreciation charges; Loans Analysis, in the same place, gives the loan instalments.
5. Reconcile and match. Reconcile every bank account in full (see section 14.3), then match the items on the control accounts and substantiate the remaining balances with the Partner Ledger.
6. Substantiate account by account. Accounting › Review › Audit › Working Files opens the review files. Each file carries the year under review and tracks progress account by account, through a status with four values:
| Status | What it indicates |
|---|---|
| To Review | The account has not been substantiated yet. |
| Reviewed | The balance has been substantiated by the person who keeps the accounts. |
| Supervised | The substantiation has been checked by a second pair of eyes. |
| Anomaly | A discrepancy has been found and is still to be dealt with. |
This is the tool that makes the review of the accounts tangible: where the previous steps produce reports, this one records who substantiated what, and separates the substantiation from its supervision.
7. Close the accounts.
- Produce the final financial statements from the Reporting menu of Accounting.
- Open Accounting › Accounting › Closing › Lock Dates… and set the Lock Everything at the year end.
- Once the accounts have been filed, come back to the same place and set the Hard Lock.
The detail of the five locks and their effects is given in section 14.5.2.
Astuce
Accounting › Review › Logs › Audit Trail retraces every change made to the documents. It is what an inspector will ask for, and it is also the way to understand after the event why a balance moved.
Note
The close is conducted with the accountant. Odoo produces the reports and secures the periods; judging the provisions and the accruals remains an accounting decision.
How it fits with the other applications
- Sales: confirmed orders generate the customer invoices.
- Purchase: orders and receipts feed the vendor bills.
- Inventory: stock movements produce the valuation entries.
- Project: time spent feeds the analytic costs and the invoicing.
- Payroll: payslips generate the personnel expense entries.